Category Archives: Art Lessons

Kimonos

Standard

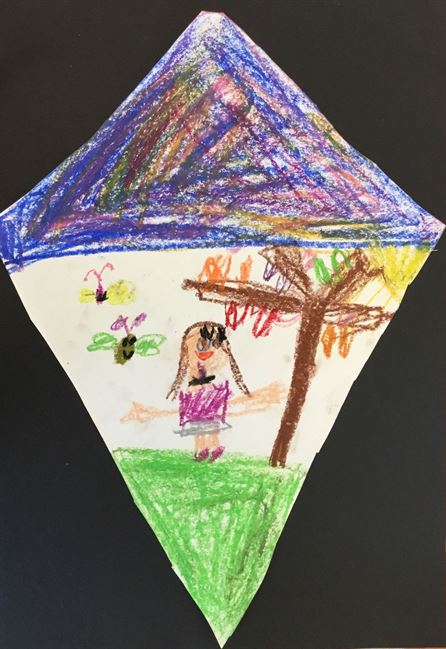
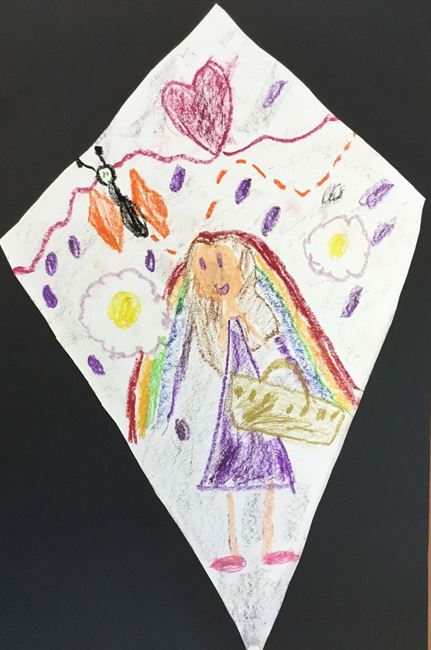
Based on the work of Itchiku Kubota (1917-2003)

The San Diego Museum of art and the Timken had a fabulous exhibition of kimonos created by artist Itchiku Kubota in 2008-2009. You can see the Kubota kimono collection at https://thekubotacollection.com

For this lesson, I first taught in 2015. I taught my students how to make a basic kimono shape and they added different elements such as flowers and patterns in black permanent marker and/or oil pastel. When they were finished, they could add watercolor on top.

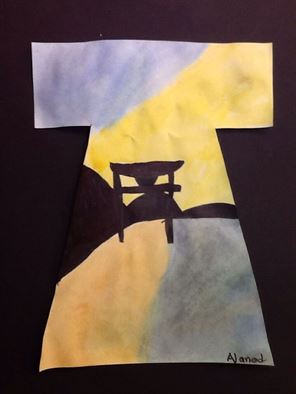
I went to the educator’s open house at San Diego Museum of Art and loved the exhibition so much that I went back multiple times to see the kimonos. The museum had a collage lesson that had been created by artist Jane LaFazio. It was beautiful but far too complex with too many steps for our 45 minute lessons.

We displayed these next to koinobori fish that had been done by third grade and cherry blossoms that had been done by the K/1 students.

Putz House

Standard

I used to do after school art classes. We charged a nominal fee to cover costs and students made some amazing art along. My favorite year was the year we did holiday gifts. I had come across Putz houses at a Vintage Boutique shop in our area. I just knew my students would love them. There are loads of patterns out there on the internet and I tried to find the easiest ones I could knowing I would be doing most of the heavy lifting. These were done by 2-5 grade students.

I brought in the pre-cut patterns, tissue, and battery operated candles. Students added color, details and a bit of glitter. We used cereal cardboard and only 90 minutes. More time would have been ideal.

One student took theirs home and embellished with loads of extras. I love that this student enjoyed the project so much that she made another one with her family and friends. I think they are simply stunning.

Winter or Ice Castles

Standard

I love this project. It is a fun one to teach tint, shade, and tone during the winter months. Students drew castles in Sharpie marker on a separate paper from the background. For the background, they painted cool winter backgrounds using tints, shades and tones of cool colors. They then cut out and glued the castle onto the background. I typically do shorter lessons so this was done in about 45 minutes. With the paint still wet, we used white glue to adhere the castles to the background and it worked out great.

I generally show my students pictures of ice castles from around the world to inspire them. They are encouraged to create their own type of castle and use tints, shades, and tones to make the image more interesting.

Boat Collage

Standard

This lesson came about because of an abundance of construction paper. Students tore the paper into long strips and used glue to collage them along the bottom of a larger paper. They added sailboats as they chose to and colored the sky with oil pastels.

I tied it in to artists who painted ships like Winslow Homer, Thomas Birch, and Claude-Joseph Vernet. We live near the ocean so many of the students had been on a sailboat but I also showed them pictures of sailboats for reference.

Ice Skaters

Standard

This is always a favorite winter project.

My students fold their paper in half and draw a landscape image on the top half using water based markers. When finished, they paint the bottom half with a generous coating of water. They fold the top half over the bottom to create a mono print.

When the mono print is dry, we made small figure skaters or ice hockey players in action poses to cut out and glue (collage) on the bottom half of the picture which now looks like a reflected skating pond. I usually do these with second grade.

Sand Painting

Standard

I received a large donation of glass yogurt containers and colored sand leftover from a school event. I decided these two items could easily go together by creating sand paintings.

My students layered sand in the jars and used skewers and wooden sticks to move the sand in the jars creating patterns and lines. When finished, they added a thick layer of PVA glue and a piece of felt.

Miniature Accordion Books

Standard

Over the summer, I connected a lot with fellow art teachers through my membership in the California Art Educator’s Association. We had Zoom happy hours, book clubs and workshops. It was really a nice way to learn and have fun while we were all stuck at home.

One of my favorite activities was shared with us from one of our members who teaches college. She sent us each a small package with the makings for a tiny accordion book. They were so much fun that I made about ten to share with my family and friends. She sent us chipboard, but I used a cut up cardboard box for the ones I did later and they came out pretty nice. The chipboard is more rigid than corrugated cardboard. I also used decorative tape as I did not have any book cloth. That also worked okay but I have since purchased a roll of bookcloth to do this with my own students. I suppose you could use book tape as well.

Here are the measurements we used:

2 chipboard covers 1.5″ x 2″ each

1 chipboard spine 2″ x .5″

1 piece of book cloth  4.5″ x 2″

2 decorated papers for covers 2.75″ x 2″

1 watercolor paper piece for pages 1.75″ x 22″

White glue, scissors, bone folder or butter knife, rubber band or ribbon

They were so popular that I noticed several art teachers have incorporated them in their projects for their students this year.

For this little book, I chose some travel photos out of a magazine and did not close the spine. Instead, I folded the accordion a little smaller and made more of a flag book.

This one I closed with a bit of ribbon. It seems that the books need a ribbon or rubber band to stay fully closed.

Kindergarten Kites

Standard

When Kindergarten was learning about shapes and weather, students created diamond shaped kites.

To help expedite this lesson, I had drawn simple kites onto the paper so that they could cut them on their own.

Students looked at pictures of kites and chose to create their own designs. Some chose to draw pictures, others chose to color them in their favorite colors.

Winter Portraits and Snowflakes

Standard

For our portraits this year, students drew themselves in colorful sweaters and hats.

Here in Southern CA, we don’t really need them. Most of my students rarely leave our warm climate so I always bring in pictures to share of winter sweaters, jackets, and hats.

For my students who finished early, I set up a table with some printer paper that they could make snowflakes with. Many had never tried making snowflakes so it was a fun project for them. I told them they could try at home with advertisements, magazines or newspaper.